Friday, August 18, 2023

Secure Azure Open AI using Azure Front Door WAF

 8 min to read.

Abstract

Azure Open AI adoption for application innovation is in full speed. With the same speed security teams are analyzing and doing VAPT on Azure Open AI endpoints. Recently a customer’s security team gave big list of 30+ vulnerabilities for their Azure Open AI endpoint.

So obvious question from application team “what can we do for security of Azure Open AI?”

This article step by step guide is for using Azure Front Door Web Application Firewall (WAF) with Azure Open AI.

The Challenge

In my opinion performing VAPT on direct open AI endpoint and calling it unsecure is incorrect approach. If an application team develops and host APIs on say Azure App Service/ AKS/ ARO/ Container Apps; it will also have similar vulnerabilities. Because these are plain APIs and not security appliances. We need to use Security appliances in front of APIs to secure them.

This is similar type of scenario when you create Azure Open AI service in your Azure subscription. Therefore we need to address below security aspects for Azure Open AI endpoint –

       1.      OWASP common vulnerabilities protection
2.      Azure Open AI endpoint should not be hit directly from end client applications like web app/ mobile app.
3.      If possible, remove public access to Open AI endpoint completely.

Solution

The standard approach to protect Azure Open AI APIs will be to use Web Application Firewall (WAF).

WAF on Azure Native technology offering is either Application Gateway or Azure Front Door. I will use Azure Front Door in this article.

Lets start.

Create Azure Open AI Service

Please don’t ask “how do I get access to Open AI in my Azure subscription?”. It is not in my control and I can’t even influence it. Follow the general procedure mentioned here.

Once you have access to Azure Open AI follow the below procedure to create it.

How-to:Create and deploy an Azure OpenAI Service resource - Azure OpenAI | MicrosoftLearn

From this link make sure that you choose “option 1: Allow all networks”. Don’t follow “specific networks only” and “disable network access” scenario for now.

Now Azure Open AI service instance is created. Next step will be to create deployment. Click on “Create New Deployment -> Add details as shown with model selected as gpt-35-turbo. Click on Create to complete model deployment.


Once model is created, select it and click on “Open in Playground”. Then click on “View Code” under “Chat Session” section. A pop up will appear showing Azure Open AI endpoint, and an access key as shown below –

Lets try Azure Open AI endpoint in Postman and get the output. To run in postman I used below details –

Body added in postman is as follows –

{

    "messages": [

        {

            "role""system",

            "content""You are an AI assistant that helps people find information."

        },

        {

            "role""user",

            "content""What is Azure OpenAI?"

        }

    ]

}

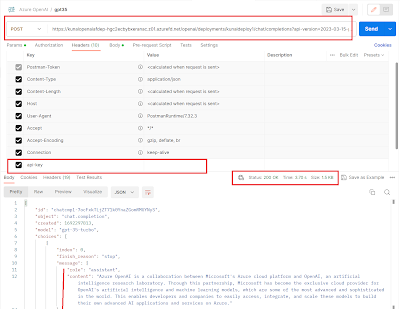
Rest of the setting with header in Postman as below. As you can see the outcome is 200 successful response.

Here we have used Azure Open AI endpoint directly in postman. As a next step lets create Azure Front Door and configure Azure Open AI as a backend to Azure Front Door.

Create Azure Front Door Service

On Azure portal click on Create -> In Search box type FrontDoor and Select FrontDoor Service creation option. Then on offerings page select options “Azure Front Door” and “Custom Create” as shown below – [click on image to get better view].


On Profile page under Basic tab select tier as “premium” and Resource group, service name as per your choice. Refer details as below. I could have chosen Standard tier however later in the future I am going to show AFD + Azure OpenAI with private endpoint which will be supported in Premium tier of AFD. [click on image to get better view].


Keep Secrets tab empty for now. On “Endpoint” tab click on “ Add an endpoint” button. Provide name as you wish. The click on Add. Refer to below screenshot – [click on image to get better view].


Then click on “Add a route” option in “Endpoint” tab. Add name as “myRoute”. Then click on “Add a new Origin Group”. Name it as “myOriginGroup”. Then click on “Add a Origin” button as shown below –


On the add Origin screen, I selected origin type as “custom” as Azure OpenAI does not appear inside the Azure front door origin types list. As of now I have not enabled the private endpoint for Azure Open AI. Refer to the screenshot below for rest of the inputs. Then click on “add” to finalize on Origin creation.


You will be redirected back to Origin group screen. Here the screen asks about enabling health probe. In Azure Front Door Health Probes can’t work with Authentication, however Azure Open AI endpoint API need API Key header for authentication. Also my intent is to show how we can WAF protection for Open AI. There are other ways by which you can check Azure Open AI endpoint health status. Therefore here I will disable the Health Probe. Click on Add button to finish Origin group creation.


This will bring back to add route screen. Keep Origin Path blank, Forwarding protocol to “match incoming requests”, Caching option is unchecked. Then click on add to finish route adding.

On the same page click on “Add Policy” button. Provide the name as “myPolicy”, select Azure OpenAI domain listed under “Domains” dropdown. Under WAF Policy option, click on Create New and name it as MyWAFPolicy. Check the option “add bot protection”. Finally click on Save to complete WAF policy creation.


Then click on “review and Create” button to finish Azure front door service creation process.

Output

Now we have Azure Front Door WAF ready with Azure Open AI endpoint as backend. Lets try to access Open AI endpoint using Azure Front Door URL via Postman.

My original Azure Open AI Endpoint is  - https://kunalgenai.openai.azure.com/openai/deployments/kunaldeploy1/chat/completions?api-version=2023-03-15-preview  

With Azure Front Door it will be - https://kunalopenaiafdep-hgc2ecbybxeranac.z01.azurefd.net/openai/deployments/kunaldeploy1/chat/completions?api-version=2023-03-15-preview

Try the Azure Front Door URL in postman, with same body, same headers, same api key and I see that result is successful. Refer below screenshot –


I have not tested with Azure Open AI with private endpoint. Please test it and add your experience in comments.

Conclusion

Hope this article helped you to secure Azure Open AI endpoint using Azure Front Door (AFD) (WAF).

Happy Generative AI..ing!!

A humble request!

Internet is creating a lot of digital garbage. If you feel this a quality blog and someone will definitely get benefited, don't hesitate to hit share button present below. Your one share will save many precious hours of a developer. Thank you.

Next Related Posts

AzureVirtual Machines should be connected to allowed multiple virtual networks.

Start stop multiple Azure VMs on schedule and save cost!

Export Azure VMs to CSV!

Azure Migration frequently asked questions, not easily answered!

Azure VM disk encryption, what should be my approach!

Sunday, July 30, 2023

Azure Virtual machines should be connected to an approved MULTIPLE virtual networks

 8 min to read.

Abstract

Virtual machines should be connected to an approved virtual network - This default Azure policy is fantastic. This policy checks if a VM is part of approved VNET; else it shows compliance message.

However it only offers VMs to be checked against single VNET name. In reality, we have flood of Azure VNETs across multiple Azure subscriptions.

So we need a policy that can check all Azure VMs against “multiple azure Virtual Networks”.

This article talks about creating a policy that allows to provision Azure VMs inside only allowed list of VNETs.


The Challenge

This policy will be built as custom. I want to do below –

Evaluate every NIC against the VNET names present in input parameter. Refer yellow and green highlight below. I need to –

1.       Loop using for or for-each

2.       Dynamically get values of all items present in a parameter after performing “split” on the input string.


  "mode""All",

  "policyRule": {

    "if": {

      "allOf": [

        {

          "field""type",

          "equals""Microsoft.Network/networkInterfaces"

        },

        {

          "not": {

            "field""Microsoft.Network/networkInterfaces/ipconfigurations[*].subnet.id",

            "contains""[parameters('virtualNetworkIds')]"

          }

        }

      ]

    },

    "then": {

      "effect""[parameters('effect')]"

    }

  },

  "parameters": {

    "effect": {

      "type""String",

      "metadata": {

        "displayName""Effect",

        "description""The effect determines what happens when the policy rule is evaluated to match"

      },

      "allowedValues": [

        "Audit",

        "Deny",

        "Disabled"

      ],

      "defaultValue""Audit"

    },

    "virtualNetworkIds": {

      "type""String",

      "metadata": {

        "displayName""Virtual network Names",

        "description""Resource name of the virtual network. Example: Add , separated multiple values."

      }

    }

  }

}

The input parameter to this policy will be more than one names of VNETs. Unfortunately in Azure policy I could not find a way to iterate over input parameters by using for-each loop construct.

There is a Current function available however it can be used only when we are using Count and Where function. Also these functions are used over Field property, used as an array. These functions cant be used when input parameter is not an array.

Therefore we need a way to iterate over input parameters array and comparing every parameter value with one subnet id Field highlighted as green above.

Solution

If we see the outcome of below line  - "Microsoft.Network/networkInterfaces/ipconfigurations[*].subnet.id",

It will be resolved to id format of subnet similar to below - "/subscriptions/SubId/resourceGroups/rg--net/providers/Microsoft.Network/virtualNetworks/vnet-01/subnets/default"

So we just need to use expertise string functions lie split, combine, concat etc. in a such a way that we take out only VENT name from above string. Therefore lets write code to covert to string and then split so as to get VNET name. Final code is as below –

"[split(string(field('Microsoft.Network/networkInterfaces/ipconfigurations[*].subnet.id')),'/')[8]]"

Creating Custom Policy

Login to Azure portal -> In middle top search box type “Policies” -> Select Definitions -> Create New. Then add values as shown below. The name of the policy I have given as “Azure Resources should be connected to an approved virtual networks”. Code of policy to be added under section “POLICY RULE” can be taken from github link shared below.

Also whenever we create custom policy always get it added in new Category as “My Custom Policies”. Do not add any Role Assignment. Then save to finish policy creation wizard. [click to get better view.]


Open the newly created policy and click on Assign. [click to get better view].


On the Basics tab, make “policy enforcement” option as disabled. We want to just view the report of azure resources not deployed in approved VNET. If we enforce policy means it will not allow to provision new resources in any of the VNET other  than listed in parameters tab below. For testing purpose I disabled policy enforcement.

Under “Remediation” tab uncheck the option “create a managed identity”.

On Parameters tab, make sure that you add names of all VNETs against which you want to evaluate azure resources is added in below shown format only. Then Click on “Save” button for VNET names added and click on “Review and Create” to complete assignment process.


Output

Virtual Machines

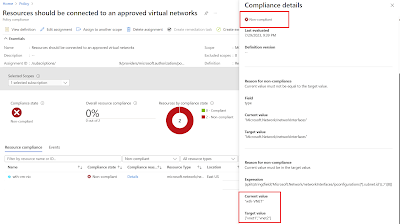
I could see that Virtual Machines not listed under the VNETs I added as parameter. Refer screenshots [click to get better view] –


Same policy will also be automatically applied on Azure App Service configured with private endpoint. Refer below output –


Full and final working policy is present at this Github link –

kunalchandratre1/NicVnetPolicy:This repo has code related to Azure policy to identify Azure resources whichare not deployed in approved VNETs. (github.com)

Important –

This policy will not work for Azure Kubernetes Service, VM Scale Sets as their NIC resource provider format is different. However this policy should work as is for all types of private endpoints where NIC is create with resource provider format of Microsoft.Network/networkInterfaces/.

I have not tested with other types of private endpoint. Please test it and add your experience in comments.

Conclusion

Hope this article helped you to build custom policy and helped to achieve your compliance and governance. Let me know your views in comments section below to improve and what are your thoughts on this approach.

Happy Azure Governance!!

A humble request!

Internet is creating a lot of digital garbage. If you feel this a quality blog and someone will definitely get benefited, don't hesitate to hit share button present below. Your one share will save many precious hours of a developer. Thank you.

Next Related Posts

Azure Virtual Machines – real world frequently asked questions – not easily answered.

Start stop multiple Azure VMs on schedule and save cost!

Export Azure VMs to CSV!

Azure Migration frequently asked questions, not easily answered!

Azure VM disk encryption, what should be my approach!

Friday, July 9, 2021

Azure Firewall with Static Outbound Public IP – Azure NAT Gateway

12 min to read.

Abstract

Below conversation may come as a surprise for some organizations when they onboard on Azure Firewall – [Click on image to get better view]


Azure Firewall randomly selects attached public IPs for outbound SNAT connections.

Many times for outbound connections, organizations prefer to use static public IP for Outbound SNAT connections. This helps a lot in whitelisting at organization customer’s / partner’s end. As of today Azure Firewall do not offer this capability.

This article talks about; how can you make sure that traffic leaving Azure Firewall uses a static public outbound IP addresses or range of static public IP addresses.

The solution proposed below is being used in many large enterprises today successfully, for providing static outbound IP to Azure Firewall.

Let’s go!

Understanding inbound and outbound connections

In below diagram I have one Azure VNET in which I have deployed one windows server and Azure Firewall instance in dedicated subnet. Let us quickly understand what is inbound and outbound traffic flow.

The Azure VM do not have any public IP assigned to it. If I host a sample application on top of this Azure VM then public facing endpoint is public IP of Azure Firewall.

Inbound means traffic originating from internet and reaching to Azure VM through DNAT operation of Azure Firewall. Refer below diagram – [click on image to get better view].


Note – Remember, for the inbound connection there will be response sent. This is response traffic and not outbound traffic.

Outbound means traffic generated within Azure environment and going out to internet. Refer below diagram – [click on image to get better view].


Problem Statement

No Outbound Static IP

Now that inbound and outbound traffic is clear; in above diagram Partner DC may ask for public IP of your Azure environment to whitelist in their firewalls. So in that case we will need static public IP/ range of public Ips assigned to firewall.

This way outbound traffic generated with Azure [in our case inside Azure VM] to partner DC will be SNAT to static public IP.

However as stated above; Azure Firewall randomly picks up any public IP assigned to it for outbound SNAT. This proposes challenges to customers.

Limited SNAT ports

Another important point to consider is about SNAT ports. When traffic goes out from firewall, a port will be used to send the traffic outbound. These number of ports are always per public IP assigned to Azure Firewall. Azure Firewall offers 2048 ports per public IP assigned. This might be a lower number based on application nature.

Whenever one outbound connection is made, one port will used from Azure Firewall. The engaged port is not released until connection operation is completed. At the same time if Azure Firewall needs to make another outbound connection then another port will be used.

This means, at any given point, one instance of Azure Firewall service with one public IP attached, can make maximum 2048 outbound concurrent connections.

Azure Firewall support max 250 public Ips. So total SNAT ports available on Azure Firewall – 250*2048 = 512,000.

However, 250 public IP is still a big number. You do not attach so many public Ips to Firewall instance out of the blue. You generally attach per application. Bringing 250 applications behind single Azure Firewall instance may not be possible right away when you start Azure journey.

At the same time; your single application running behind Azure firewall may easily need concurrent a million outbound connections. Example, WebSocket based chat application, mobile app communication using websockets.

Therefore we need a way by which we can scale SNAT ports as well for outbound connections passing through Azure Firewall.

Verifying Random IP Behavior

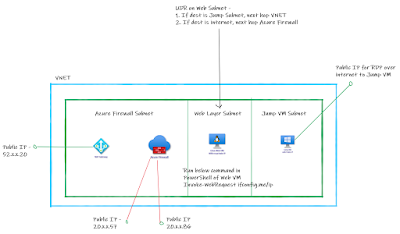
I have below construct in my Azure Subscription. [Click on the image to get better view] –

1.      Created VNET with 3 subnets – Firewall Subnet, Web VM subnet, Jump VM Subnet

2.      Attached two public Ips to Azure Firewall.

3.      Created Web VM in Web Layer and did NOT attach any public IP.

4.      Create Route Table with below routes and attached to web layer subnet

a.      If destination is Jump Layer subnet – next hop VNET

b.      If destination is internet [0.0.0.0/0] – next hop AzureFirewall IP.

5.      Created Jump VM WITH Public IP; just to take RDP to web VM over its private ip.


Here are the screenshots of Azure Firewall IP configurations and UDR on Web Layer Subnet. [click to get better view].


I am going to add ifconfig.me domain inside Azure firewall to allow the outbound traffic. Therefore we need to add DNS settings on Azure Firewall. Below is the screenshot to add the same – [click to get better view].


We will be using ifconfig.me URL to get the IP. Therefore allow the same in Azure Firewall as shown below using application rules. [click to get better view].

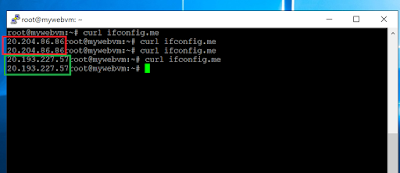
Now when I run command Curl ifconfig.me/ip from putty of Web VM; we see the firewall IP as an output. This means because of UDR attached to web layer, internet traffic initiated from web vm is passing through Azure Firewall. Azure Firewall then sending to internet by SNAT [Source NAT] to its own one of the public IP.

From below screenshot you can clearly see that any random IP out of two public Ips attached 
to Azure Firewall, is being used while outbound traffic is SNAT from Azure Firewall. 
[click to get better view]. 


From above screenshot it is visible that out of the two public Ips random IP is being chosen for outbound access.

Here is the Deal…NAT Gateway!

Microsoft Azure releases Virtual Network NAT service that simplifies the outbound-only internet connectivity for virtual networks. When configured on a subnet, all outbound connectivity uses your specified static public IP addresses.

Many times this service is also referred to as NAT Gateway.

Per public IP attached to NAT gateway we get 64,000 outbound SNAT ports. One NAT gateway can have 16 public IP addresses attached.

So total outbound SNAT ports available with a NAT gateway = 16 * 64,000 = 1,024,000.

So NAT Gateway is our solution to get Static Public IP for outbound traffic flowing through Azure Firewall.

Create NAT gateway and associate to subnet of Azure Firewall. Assign a public IP to NAT gateway. So as shown in the below diagram, even if the Azure Firewall has 2 public IP addresses; traffic originating from Web VM always take NAT Gateway associated public IP as outbound IP. [click to get better view].


Create NAT GW and associate to AzureFirewallSubnet using below sample powershell commands. Make sure you replace Resource groups name, VNET Name and location as appropriate.

# Create public IP addresses

New-AzPublicIpAddress -Name public-ip-1 -ResourceGroupName AzFwStaticIPRG -Sku Standard -AllocationMethod Static -Location 'Central India'

# Create NAT gateway

$PublicIPAddress1 = Get-AzPublicIpAddress -Name public-ip-1 -ResourceGroupName AzFwStaticIPRG

New-AzNatGateway -Name firewall-nat -ResourceGroupName AzFwStaticIPRG -PublicIpAddress $PublicIPAddress1 -Location 'Central India' -Sku Standard

# Associate NAT gateway to subnet

$virtualNetwork = Get-AzVirtualNetwork -Name MyVNET -ResourceGroupName AzFwStaticIPRG

$natGateway = Get-AzNatGateway -Name firewall-nat -ResourceGroupName AzFwStaticIPRG

$firewallSubnet = $virtualNetwork.subnets | Where-Object -Property Name -eq AzureFirewallSubnet

$firewallSubnet.NatGateway = $natGateway

$virtualNetwork | Set-AzVirtualNetwork

 The Azure NAT Gateway I created has public IP address 52.x.x.20 and is visible on Azure portal as below – [click to get better view].


Similarly it is associated to AzureFirewallSubnet as shown below – [click to get better view].


Verifying Static Outbound IP Address

Logged in to webvm using SSH and ran curl ifconfig.me command. We can see that it is showing Nat Gateway IP. Using NAT Gateway, for outbound traffic passing through Azure Firewall NEVER selected random IP from Azure firewall. [click to get better view].


Conclusion

Hope this article helped to overcome behavior of random public IP selection of Azure Firewall for outbound traffic. NAT Gateway is fully managed service and helps to configure static public outbound IP for outbound traffic passing through Azure Firewall.

Happy Static IPs!

A humble request!

Internet is creating a lot of digital garbage. If you feel this a quality blog and someone will definitely get benefited, don't hesitate to hit share button present below. Your one share will save many precious hours of a developer. Thank you.

Next Related Posts

Proven Azure Architecture Patterns using PaloAlto NGFW and F5 DDoS and WAF

4 VNETs and transitive Routing using Azure firewall

Azure Virtual Machines – real world frequently asked questions – not easily answered.

Azure VM disk encryption, what should be my approach!

Bypass onpremises firewall to RDP or SSH into Azure VM